

Requirements
To use the Formal Connector with Snowflake, you must have access to your Snowflake account and the necessary permissions to manage resources within it.Configuration
- Snowflake account URL: Your Snowflake account URL, typically in the format
X.Y.snowflakecomputing.com. Refer to the displayed image for clarity.
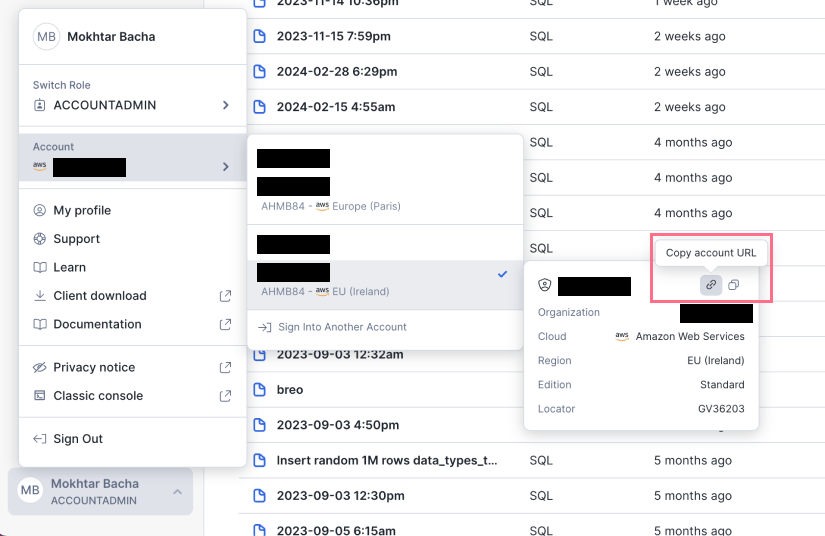
- Snowflake username and password: These credentials will be used by Formal users to connect to your Snowflake account.
Native Users
Native Users define the Snowflake credentials used by the Connector. Both password and key-pair authentication are supported.Resources that have not migrated to new Native Users encode both methods as
Password Native Users. See
legacy Snowflake key pairs.
Password Authentication
Choose Password, then configure the upstream Snowflake username and password.Key-Pair Authentication
To use key-pair authentication (SNOWFLAKE_JWT), choose Snowflake Key and
set the key to the PEM-encoded private key. Formal uses JWT authentication when
connecting to Snowflake.
snowflake-key-users and password authentication for everyone else. Clients
can also request either label explicitly. See
Select a default Native User
for selection examples.
The client authenticator must match the selected Native User. Use
SNOWFLAKE_JWT for Snowflake Key and password authentication for
Password.TLS Configuration
TLS must be enabled for secure communication. You have two options:- Formal-Managed TLS: Formal will manage the TLS Certificate for you, providing you with a domain of the format
.YOUR_ORG_NAME.connectors.joinformal.com. - Self-Managed TLS: If you prefer to manage the TLS certificate yourself, follow these steps:
- Obtain a TLS wildcard certificate.
- Add CNAME records for
account.hostname,s3.hostname,backend.hostname, andapp.hostnameto your DNS. - Provide the TLS certificate through environment variables:
When Formal manages the TLS certificate, the Network Load Balancer (NLB) must be internet-facing.
Connecting to Snowflake
With the above configuration complete, you can now connect to Snowflake using the specified hostname and Formal credentials.Connection Parameters
When configuring a Snowflake client to connect through the Formal Connector, note the following:- Host: Must use the
account.subdomain prefix on your Formal connector hostname. For example, if your connector hostname ismy-org.connectors.joinformal.com, the host should beaccount.my-org.connectors.joinformal.com. Use the literal value “account” instead of passing the account identifier. - Account: Set this to be your Snowflake account identifier. This is the first segment of your Snowflake account URL (
<account id>.snowflakecomputing.com). - Port: The port your connector listener is configured on (e.g.,
443or1443). - User: Your Formal identity (e.g.,
idp:formal:human:you@yourcompany.comoridp:formal:machine:my-service). - Authenticator: Must match the authenticator method configured on the native user in Formal. If the native user uses key-pair authentication (
SNOWFLAKE_JWT), your Formal client must also useSNOWFLAKE_JWT. If the native user uses password authentication, your client should use password authentication.
Connecting via the Snowflake CLI (snow)
Add a connection to ~/.snowflake/config.toml:
Password Authentication
Key-Pair Authentication (SNOWFLAKE_JWT)
SNOWFLAKE_JWT, the private key file should be the PEM file available via the Download Private Key button on the machine user details page in the Control Plane.
Test the connection:
--debug for verbose logging if troubleshooting:
Connecting to Snowflake via Retool
- Configure the Connector for Snowflake: Ensure your Formal Connector is correctly set up to proxy Snowflake connections.
- Update Retool Resource: Retool requires an account identifier to connect to Snowflake. However, to use Formal with Snowflake, you need to bypass this limitation by ensuring Retool supports custom connection options similar to PostgreSQL resources. This allows for more flexible connections, including the ability to specify the full HTTP URL instead of just the account identifier.
- Custom Snowflake Hostname: For a successful connection, it’s crucial to set a custom Snowflake hostname that points to the Formal Connector. This is necessary because Retool’s default configuration might not support the direct use of custom domains for Snowflake connections.
- Connection String: Use the following JDBC connection string format for connecting to Snowflake through Formal:
End-User Identity Propagation
When a machine user (e.g., a BI tool) connects to Snowflake through Formal, you can propagate the actual end-user’s identity so that policies evaluate against the human user, not the shared machine credential. Formal supports two mechanisms for this, depending on the BI tool.Omni
Omni propagates end-user identity at session login time via theQUERY_TAG session parameter. When an Omni user runs a query, Omni includes a JSON-encoded QUERY_TAG in the Snowflake login request containing the omniOrganizationUserId field. The Formal Connector extracts this ID and resolves it to a Formal user via external ID mappings.
To set this up:
1
Create a BI Integration
In the Control Plane, go to BI Integrations and create a new Omni integration.
2
Map External IDs
Open each Formal user → External Connections, click Map External
ID, select the Omni integration, and set the value to that user’s
omniOrganizationUserId in Omni.3
Verify
Run a query through Omni and check Logs to confirm the end-user is correctly attributed.
Omni resolves end-user identity once per session at login time. All queries within that session are attributed to the same end-user.
Other BI Tools (Metabase, Sigma, Hex, Custom)
Other BI tools propagate end-user identity per query via SQL comments. These tools append a comment to each SQL statement containing the end-user’s external ID, which the Connector parses on every request. For example, a query from Metabase might look like:Looker (FORMAL_ENDUSER)
Looker uses a different mechanism: theFORMAL_ENDUSER session parameter passed via JDBC connection options. This resolves the end-user by email address rather than external ID. See the Looker setup instructions for details.
Policy Evaluation
Formal supports the following policy evaluation stages for Snowflake:- Session: Evaluate and enforce policies at connection time
- Request: Evaluate and enforce policies before query execution
- Response: Evaluate and enforce policies after data retrieval
Troubleshooting
Common Issues and Solutions
- “403: Host forbidden”: The connector uses subdomain-based routing. Ensure the
hostin your connection config uses theaccount.prefix (e.g.,account.my-org.connectors.joinformal.com), not the bare connector hostname. - Error code
390102(Incorrect username or password): The Connector reached Snowflake, but the Native User credentials were rejected. Verify the upstream username and secret. For environment-backed secrets, confirm the named variable exists in the Connector deployment. - Authenticator mismatch: If the native user in Formal is configured with key-pair auth, your client must also use
SNOWFLAKE_JWTas the authenticator. A mismatch will cause authentication failures. - Ensure TLS certificates are correctly set up, and DNS records are pointing to the NLB.
- Verify JDBC driver compatibility, especially if using self-signed certificates with Formal.